One of the nice features that you have available when you use Quickbooks in your Law Office, is the built in time tracking feature. We teach attorneys, paralegals and office staff to record their time and use that to generate bills for clients, track time spend on administrative tasks and to track non-billable time. Using the extensive reports that are available it is easy to quickly see at a glance how your office is performing.
Time Tracking
There are actually two ways that you can enter time in QuickBooks:
- The Use Weekly Timesheet window
- The Time / Enter Single Activity window
While they both give you the same result and allow you to assign time to clients, classes and enter details, the advantage to using the Weekly Timesheet is you can see your whole week at a glance and it’s easy for you to see how much time you have booked each day. It can also be used to see the time entered by other staff members for the week. The Time / Enter Single Activity shows you the time that you have spent on a single activity.
Weekly Timesheet Window
The weekly timesheet in QuickBooks is easy because it feels like a spreadsheet with columns for the days of the week and each row is a new activity. If you have ever used Excel you will feel comfortable in the weekly time sheet window.
Like many features in QuickBooks, there are several ways to get to the weekly timesheet. You can click on Employees from the Main Menu and choose Enter Time then Use Weekly Timesheet, or you can click on Enter Time on the Home Page and select Use Weekly Timesheet from the fly-out menu.
Either way will bring up the Weekly Timesheet window. Once that is up, you need to select the staff member that you want to view and/or record time for. You do that in the Name field at the top of the window.
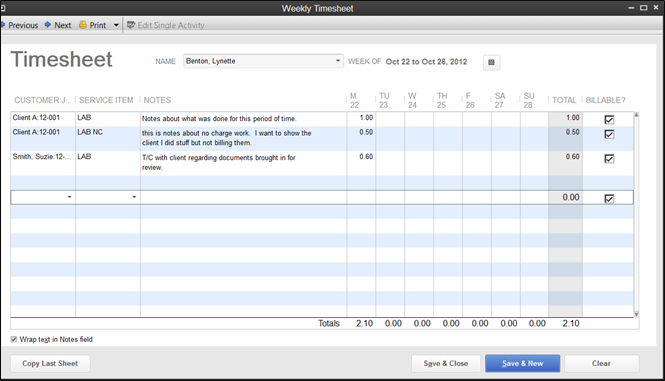
Taking a look at the timesheet window, you see the Previous and Next buttons a the top, these allow you to move forward or backward one week at a time. You also have button to print your timesheet. The main part of the window is the spreadsheet like interface to select clients and enter the details.
The bottom row of the column shows the total time entered for that day making it easy to quickly see at a glance how you are doing for the day and the last cell is the total time entered for the week.
Using the Weekly Timesheet
First you need to select a user and make sure that you are displaying the correct week. If you have time recorded for that week, it will appear in the window. If you need to change the date, click on the small calendar icon to the right of the date. Select a new date and the new date range will appear in the timesheet.
To enter an activity in the timesheet:
- Choose the customer in the Customer:Job field. Just start typing the customer name and QuickBooks will help populate the field.
- In the next cell, choose the Service Item that you are recording time for.
- If you are doing payroll you will also see a column for payroll item.
- Enter a description in the notes area. This is what will pull into the invoice or statement charge so be descriptive – you can edit this description once you pull the time into an invoice.
- Click on the column that corresponds to the day that you are entering time and put in the time spent on the activity.
- The final column will have a check-box to tell QuickBooks if this activity is billable. If it is billable to a client, then leave the box checked. If it is for administrative time or other non-billable time, uncheck the box.
- Enter each activity on a new row, and don’t worry if you get to the bottom of the window and you are running out of lines. QuickBooks will add as many rows as you need. You will just see a scroll bar on the right side that will allow you to move up and down the timesheet if it cannot fit all in one screen.
Make sure that when you are finished with an activity that you save the timesheet. You can click on Save and Close at the bottom if you are finished with the time sheet, or if you want to move to a different time keeper or a different week, click on Save & New. You can also click on the Previous or Next button at the top of the window to save your changes.
Quick Tip #1
While you can use your mouse to click in the cells, I have found it much quicker to just use the tab key on the keyboard. Pressing tab will move you to the cell in the next column. When you are at the end of a row, tab will bring you to a new row ready to enter a new activity.
Quick Tip #2
Notice the check-box by the Wrap text in Notes field in the bottom left corner of the window. If you type detailed notes you may want to turn that on to see the entire description for each activity. Uncheck it to see a simple single line view.